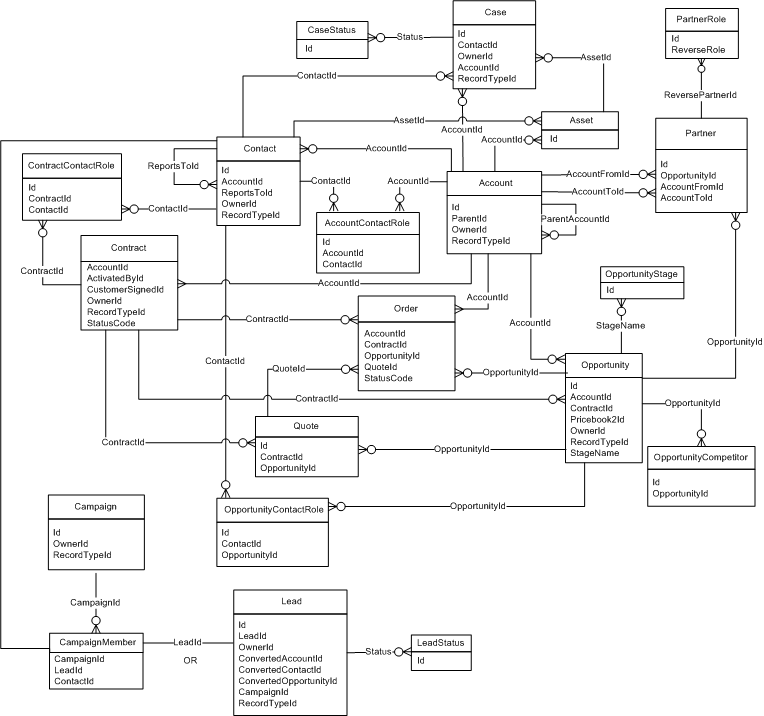
–> Excelente site com diversos modelos de dados.
Quotation Management System – e-Procurement
Google:
quotation management “open source”
rfq php “open source” quotation
cotacao electronica
electronic quotation system open source
–> Excelente site com diversos modelos de dados.
Quotation Management System – e-Procurement
Google:
quotation management “open source”
rfq php “open source” quotation
cotacao electronica
electronic quotation system open source
CodeIgniter (CI), the PHP framework, has evolved towards version 2.0. The main version feature is scripts are being rewritten in PHP5 (helpers in former verisons were still in PHP4). This framework is lightweight and helps developers work faster. This post will tackle :
1. CI installation
First download CodeIgniter 2.0 source from http://codeigniter.com/ (follow the link ‘Get Source’). Unzip that file and place it in your local /www/ directory. Loading the page http://localhost:8888/codeigniter/ will display the following page (I’ve installed it on my local machine and the default port for MAMP (Mac Apache-Mysql-PHP solution) is 8888. If you’re working under windows with a WAMP solution, http://localhost/codeigniter/ will do the trick) :
The page which is displayed is /application/views/welcome_message.php which is loaded via /application/controllers/welcome.php. This controller contains the class Welcome which is defined as the default controller in /application/config/routes.php. If you want to reach that controller in the URL, you’ll have to use http://localhost:8888/codeigniter/index.php/welcome. In that URL, index.php is the CI front controller which is to be found in the root directory /codeigniter/. You will have to keep that index.php file but you can take it away from the URL :
SetEnv MAGIC_QUOTES 0
SetEnv PHP_VER 5
Options +FollowSymlinks -MultiViews
RewriteEngine On
DirectoryIndex index.php
RewriteCond %{REQUEST_URI} ^system.*
RewriteRule (.*) index.php?/$1 [L]
RewriteCond %{REQUEST_FILENAME} !-f
RewriteCond %{REQUEST_FILENAME} !-d
RewriteCond $1 !^(index\.php|images|robots\.txt|css)
RewriteRule (.*) index.php?/$1 [L]
In doing so, you’ll activate Apache Mod_rewrite and be able to load http://localhost:8888/codeigniter/index.php/welcome via http://localhost:8888/codeigniter/welcome.
Now, we’ll open some CodeIgniter configuration files to setup database connection and other stuff :
1.1. Codeigniter file structure : the MVC framework
If you take a look at the /www/codeigniter/ directory, you’ll see the following structure :
As you can see, Codeigniter is an MVC framework. The /application/ directory is the directory of your project files :
Another important directory is /system/ : it contains all the Codeigniter core files (libraries, helpers,…)
Codeigniter config files are stored in the /config/ directory. Let’s open /config/config.php and change the following lines :
Then open /config/database.php to set up the database connection information :
and change the values to suit your own configuration.
We also need to autoload CI core libraries and helpers that will automatically load at each request and make our work much easier. Open /config/autoload.php and change the following lines :
1.2. Setting up the database
Now, turn to your browser and load PhpMyAdmin : http://localhost:8888/phpmyadmin/ and execute the following queries :
CREATE DATABASE codeigniter;
CREATE TABLE users ( user_ID int unsigned not null auto_increment primary key, username varchar(20), password varchar(32) );
2. Creating the login form
The Html form we will create is rather easy. Codeigniter is made of core libraries and helpers that you’ll find in the /system/ directory. We’ve autoloaded the form helper to help us build our form.
So, create the file in /application/views/v_login.php (I use the ‘v_’ prefix to make the difference between views (‘v_’), models (‘m_’) and controller (‘c_’) files) :
<!DOCTYPE html>
<html lang="fr">
<head>
<title>Login</title>
<meta name="robots" content="index,follow" />
<meta name="description" content="Login" />
<meta http-equiv="Content-type" content="text/html; charset=iso8859-1" />
<script src="http://ajax.googleapis.com/ajax/libs/jquery/1.4/jquery.min.js"></script>
<style type="text/css">
p { margin: 0; padding: 0; }
input.textbox { width: 120px;color: #777;height: 18px;padding: 2px;border: 1px solid #E5E5E5;vertical-align: top; }
input.button { width: auto;height: 22px;padding: 2px 5px;vertical-align: top; }
</style>
</head>
<body>
<?php
echo form_open('login');
?>
<div id="message">
</div>
<p>
<label for'username'>username</label>
<?=form_input(array('name'=>'email','value'=>'','class'=>'username textbox','style'=>'width:150px;'))?><br />
</p>
<p>
<label for'password'>password</label>
<?=form_password(array('name'=>'password','value'=>'','class'=>'password textbox'))?><br />
</p>
<p>
<?='<br />'.form_submit('submit','Login','id="submit"')?>
</p>
<?=form_close("\n")?>
</body>
</html>
As you can see, the form helper is here at work with methods like ‘form_open()’, ‘form_close()’ that will automatically generate <form> and </form> tags.
The <head> of this view already contains the link to the Jquery.js file we will need to have our Ajax script work properly : <script src="http://ajax.googleapis.com/ajax/libs/jquery/1.4/jquery.min.js"></script>
The “Message” div will be used to display the Ajax Response.
The Html form is now ready but we still need to build the controller class that will load that view.
3. Creating the login controller
Create the file /application/controllers/c_login.php.
<?php if ( ! defined('BASEPATH')) exit('No direct script access allowed');
class C_login extends CI_Controller {
function __construct() {
parent::__construct();
$this->load->library('form_validation');
}
function index() {
$this->load->view('v_login');
}
}
/* End of file c_login.php */
/* Location: ./application/controllers/c_login.php */
The constructor of this controller loads the form_validation library which we will use to check the content of the posted fields. We’ll also use the url helper to build the url of the form action attribute.
In order to load this controller in a browser, you’ll simply have to call http://localhost:8888/codeigniter/c_login
The default method that will be called is the index() method that simply loads the form view (v_login.php)
To make this controller your default controller and be able to reach it via http://localhost:8888/codeigniter/, you’ll have to change /application/config/routes.php and set the default controller to c_login:
$route[‘default_controller’] = “c_login”;
If you want that controller to be reached via http://localhost:8888/codeigniter/login, simply edit /application/config/routes.php and add :
$route[‘login’] = ‘c_login’;
4. Creating the Ajax request
Let’s go back to our /views/v_login.php.
We’ll write a short javascript that will :
Just add the following code just before the </head> tag :
<script type="application/javascript">
$(document).ready(function() {
$('#submit').click(function() {
var form_data = {
username : $('.username').val(),
password : $('.password').val(),
ajax : '1'
};
$.ajax({
url: "<?php echo site_url('login/ajax_check'); ?>",
type: 'POST',
async : false,
data: form_data,
success: function(msg) {
$('#message').html(msg);
}
});
return false;
});
});
</script>
Jquery allows us to execute a function once the DOM document has been loaded : $(document).ready
The script will be triggered once the submit button is hit : $(‘#submit’).click : the # sign identifies the “id” attribute of an element of the page (the submit button in this case).
Then we store the posted variables (username and password) in the form_data array. This array also contains the “ajax” key with value “1″. This value will be checked in the controller.
Then comes the $.ajax request which contains an array :
return : false; is used to prevent the script from actually reaching the form action url through http when the submit button is clicked.
In this example, the url “login/ajax_check” will only be reachable if you add the following to the /config/routes.php :
$route['login/ajax_check'] = 'c_login/ajax_check';
5. Creating the ajax_check controller method
We will then create a second controller method called ajax_check() to check the variables posted through Ajax.
function ajax_check() {
if($this->input->post('ajax') == '1') {
$this->form_validation->set_rules('username', 'username', 'trim|required|xss_clean');
$this->form_validation->set_rules('password', 'password', 'trim|required|xss_clean');
$this->form_validation->set_message('required', 'Please fill in the fields');
if($this->form_validation->run() == FALSE) {
echo validation_errors();
} else {
echo 'login successful';
}
}
}
The script checks if the ajax variable posted equals to “1″. If so, we use the Codeigniter form_validation library to check the required fields and echo the validation errors if necessary.
6. Playing the script
Open Firefox and install Firebug addon if not yet installed :https://addons.mozilla.org/fr/firefox/addon/firebug/
This addon will let you check the different steps of the ajax request. Launch Firebug via Menu Tools / Firebug. Then activate the console to be able to check what’s happening in your page :
Open the login page : http://localhost:8888/codeigniter/login and click “submit”. You’ll see the following Ajax response :
7. Checking the database : using models
We’ll change c_login controller method ajax_check and load a model to check if the user exists in the database :
function ajax_check() {
if($this->input->post('ajax') == '1') {
$this->form_validation->set_rules('username', 'username', 'trim|required|xss_clean');
$this->form_validation->set_rules('password', 'password', 'trim|required|xss_clean');
$this->form_validation->set_message('required', 'Please fill in the fields');
if($this->form_validation->run() == FALSE) {
echo validation_errors();
} else {
$this->load->model('m_access');
$user = $this->m_access->check_user($this->input->post('username'),$this->input->post('password'));
if($user == '1') {
echo 'login successful';
} else {
echo 'unknown user';
}
}
}
}
We’ve loaded a model called m_access, then we call the method check_user and send it the username and password variables.
You’ll then create the model itself in /application/models/m_access.php :
<?
class M_access extends CI_Model {
public function check_user($username,$password) {
$this->query = $this->db->select('COUNT(*)')->from('users')->where(array('username'=>$username,'password'=>$password))->limit(1)->get();
return $this->query->row_array();
}
}
Primeiramente, baixe a ultima versão do JDK no endereço:
Aceite os termos e escolha a opção: jdk-7u5-linux-i586.tar.gz
Após baixado, descompacte o pacote com o comando:
$ tar -zxvf jdk-7u5-linux-i586.tar.gz
Após executado o comando, será criado a pasta “jdk1.7.0_05”.
Depois de descompactado o arquivo, mova e renomeie o arquivo para a pasta “/opt” de seu sistema operacional, com o comando:
$ sudo mv jdk1.7.0_05/ /opt/jdk
Obs.: Será requisitado a sua senha de superusuário.
Agora vamos configurar o sistema.
Primeiro, certifique-se de que não haja um plugin Java já instalado, para isso digite:
$ java -version
A saída deve ser:
O programa ‘java’ pode ser encontrado nos seguintes pacotes:
* default-jre
* gcj-4.6-jre-headless
* openjdk-6-jre-headless
* gcj-4.5-jre-headless
* openjdk-7-jre-headlessTente: sudo apt-get install <pacote selecionado>
Se a saída não for essa, você deve desinstalar pelo gerenciador de pacotes, qualquer programa que faça referencia ao Java.
Após feito isso, só falta configurar o classe path do Java e o plugin para o Firefox. Para configurar o classe path deve-se editar o arquivo “bash.bashrc” na pasta “/etc”.
Digite o comando:
$ sudo gedit /etc/bash.bashrc
Ao final do arquivo, acrescente as seguintes linhas:
A configuração do classe path está pronta, agora vamos configurar o plugin para o Firefox.
Digite o comando:
$ cd /usr/lib/firefox-addons/plugins/
Dentro desta pasta é onde devem ficar os plugins que o Firefox necessita, aqui devemos fazer um link simbólico para o plugin “libnpjp2.so”, que está na pasta do JDK, para isso, use o seguinte comando:
$ sudo ln -s /opt/jdk/jre/lib/i386/libnpjp2.so
Feito isso, reinicie o seu sistema para recarregar as variáveis de ambiente.
Após reiniciado, execute no terminal:
$ java -version
A saída deve ser semelhante a isso:
java version “1.7.0_05”
Java(TM) SE Runtime Environment (build 1.7.0_05-b05)
Java HotSpot(TM) Server VM (build 23.1-b03, mixed mode)
Se aparecer isso, o classe path está OK.
Bater no liquidificador todos os ingredientes, exceto a farinha de trigo. Colocar esta mistura em uma tigela e adicionar, aos poucos, a farinha até o ponto de desgrudar das mãos. Moldar os bolinhos, fritar em óleo quente e salpicar o açúcar e a canela.
Este exemplo aborda uma forma simples de indexação e busca de documentos utilizando a API do Apache Lucene, na sua atual versão 3.6. Ela pode ser baixada aqui e para utilizar em seu projeto, basta incluir a lib lucene-core-3.6.0.jar em seu classpath.
Criando o índice e definindo os termos dos documentos:
Analyzer analyzer = new StandardAnalyzer(Version.LUCENE_36); FSDirectory indexDir = FSDirectory.open(new File("/index")); IndexWriterConfig iwc = new IndexWriterConfig(Version.LUCENE_36, analyzer); IndexWriter iw = new IndexWriter(indexDir, iwc); final String FIELD_LINK = "link"; final String FIELD_POST = "post";
Na primeira linha definimos qual será o analisador tanto para a indexação, quanto a que será utilizada no momento da busca. Neste caso utilizarei a Standard, mas já se tem disponível o analyzer em diversas linguagens e também pode-se criar um próprio, se necessário.
Após é feito a criação e abertura do índice. Neste caso, utilizando um índice gravado em disco através da classe FSDirectory. Dependendo da necessidade, pode-se usar a classe RAMDirectory para trabalhar com o índice todo somente em memória.
FIELD_LINK e FIELD_POST são os dois campos de exemplos deste índice, indicando o link de uma página e o seu conteúdo, respectivamente.
Inserindo um documento no índice:
Document doc1 = new Document(); doc1.add(new Field(FIELD_LINK, "http://www.coffeecode.com.br/?doc=1", Field.Store.YES, Field.Index.NOT_ANALYZED_NO_NORMS)); doc1.add(new Field(FIELD_POST, "teste de busca em um texto livre", Field.Store.YES, Field.Index.ANALYZED)); iw.addDocument(doc1); Document doc2 = new Document(); doc2.add(new Field(FIELD_LINK, "http://www.coffeecode.com.br/?doc=2", Field.Store.YES, Field.Index.NOT_ANALYZED_NO_NORMS)); doc2.add(new Field(FIELD_POST, "outro texto para busca", Field.Store.YES, Field.Index.ANALYZED)); iw.addDocument(doc2); iw.commit();
O Lucene trabalha com documentos, então cada entrada de dados será um documento com seus campos. Assim, instanciamos a classe Document e definimos quais serão seus campos, o valor, se este valor será recuperado ou apenas buscável e se ele deve passar pelo analisador.
Feito isto, os dois documentos já estão indexados e prontos para serem buscados. Sendo assim, partimos para a busca!
IndexReader ir = IndexReader.open(indexDir); IndexSearcher is = new IndexSearcher(ir); PhraseQuery pq = new PhraseQuery(); pq.add(new Term(FIELD_POST, "livre")); TopDocs td = is.search(pq, 10); for(ScoreDoc sdoc : td.scoreDocs) { Document d = is.doc(sdoc.doc); System.out.println("Link: "+d.get(FIELD_LINK)); System.out.println("Post: "+d.get(FIELD_POST)); }
Com a classe IndexReader deixamos disponível o índice para leitura e utilizamos a IndexSearcher para passar a query e recuperar os documentos. Aqui podemos usar diversos tipos de implementações da classe Query, como a PhraseQuery, BooleanQuery, MultiPhraseQuery, TermQuery, entre outras.
A busca, neste caso, será pela palavra “livre” em cima do campo indexado post. Ela pode retornar um objeto TopDocs que contém os documentos que bateram com o termo buscado. A partir deles pode-se acessar diretamente o índice e retornar os campos desejados.
Se você deseja utilizar diretórios externos do JBoss 6 para efetuar seus deployments, faça o seguinte:
Exemplo da configuração:
<property name=”applicationURIs”>
<list elementClass=”java.net.URI”>
<value>${jboss.server.home.url}deploy</value>
<!– Add your own deploy folder –>
<value>file:c:/deploy/ds</value>
<value>file:c:/deploy/lib</value>
<value>file:c:/deploy/default</value>
</list>